‘Tis the season to be Jolly! Those of us in The States are still snacking on Thanksgiving leftovers and, while your local retailer has been unpacking Christmas merchandise since August, for most of us, the Holiday Season is just beginning. To inaugurate the season, I thought I’d offer some tips on decorating your Christmas tree this year.
Live vs Artificial

Is this the year you let go of the live tree and go with an artificial tree? There’s no denying the impact that the fragrance of a fresh cut tree makes in putting oneself in the holiday spirit. However, at the end of the season you’re faced with the task of getting rid of the tree and, depending on when you set it up (I like decorating right after Thanksgiving), you run the risk of it dying before December 25th rolls around.
An artificial tree might be a good alternative. Sure, the fragrance of silk and polyester does not entirely evoke “holiday spirit,” but manufacturers these days are making very realistic facsimiles. Artificial trees come in a variety of species and sizes so you can more easily match the tree to the room than with a live tree. An artificial tree can stay up for a longer period of time without the worry of drying needles. The branches of artificial trees are strong and can carry the weight of heavier ornaments. A quality artificial tree can be used and enjoyed for many years!
Ample space and acclimation
Whichever type of tree you go with, choose one that has ample room between the branches for the ornaments to hang. Norfolk pine, Noble fir and the Silvertip fir are excellent varieties to choose. When you decorate your Christmas tree, choose a tree that will fill the space from floor to ceiling. This means a standard ceiling would take a 7 ½ foot tree.
Choose a tree that will fill the space from floor to ceiling. This means a standard ceiling would take a 7 ½ foot tree.
If you are using an artificial tree, I suggest you get it out of storage and open it up about two weeks before setting it up for decorating. This will allow the tree to acclimate to its surroundings and its needles to relax after being in “hibernation” since last season.
If you have the space, set your tree up in the garage or the spare bedroom.
While it’s acclimating, you can add your lights. After it’s acclimated, you can set it up in the desired location, ready for family decorations.
Lighting your tree

400 -500 mini-lights.
Your lights should be installed first. When I decorate trees as a professional, I will add approximately 100 lights per 1 ½ foot of tree. A 7 ½ foot tree will take 400 -500 mini-lights.
When you decorate your Christmas tree, thread an extension cord up the trunk so you will have an electricity outlet mid-tree for other movement and lit accessories.
Buy lights that are the “end-to-end” variety and remember that for safety reasons most can only be strung three in a row. The trick to putting on the lights is that they need to be wrapped around the entire length of the branch from the trunk to the tip. This ensures your tree will truly glow from within.
Organizational tip: When storing your lights after the season, place three strands of lights in a plastic baggie to make next year’s assembly much easier.
Remember to layer your lights. When you decorate your Christmas tree, experiment with different sizes and colors for fun effects. You can also mix things up by putting different layers on separate switches and light different layers depending on your mood. I always use an electrical power-strip at the base of the tree and identify each of the layers for easy access and switching ability. Organizational tip: When storing your lights after the season, place three strands of lights in a plastic baggie to make next year’s assembly much easier.
Ribbon, three inches wide

I like to use three-inch wide ribbon. I also make sure the ribbon is wired. Wired ribbon is not cheap but if treated correctly and stored properly, three-inch wide ribbon can be reused for several seasons of decorating your Christmas tree.
For a 7 ½ foot tree, I’ll purchase three ten-yard bolts of three-inch wide, wired ribbon.
Zigzag the ribbon diagonally around the tree. Weave the ribbon in toward the trunk and back out again to give provide depth.
There will be enough ribbon to make several large bows that can be added to the tree. A bow with streamers requires five-yards of ribbon.
If you want, narrower ribbon can be purchased for the bows but don’t use ribbon smaller than one-and-three-quarter-inch.
Green pipe cleaners are great for tying bows to the tree. Texture and interest can be added by weaving cording, beaded garland and shimmers in your bows and through the tree.
Ornaments, start at the top and work down
Your ornaments should include a wide variety of shapes and sizes. I like to store my ornaments in bags by size collections. My 7 ½ foot tree will need: three dozen large ornaments about 6 to 8 inches in size; five dozen medium ornaments about 3 to 5 inches in size, and; two dozen small ornaments about 1 to 2 inches in size.
I find that using a combination of simple and ornate decorations in all sizes yields stunning results.
My 7 ½ foot tree will need: three dozen large ornaments about 6 to 8 inches in size; five dozen medium ornaments about 3 to 5 inches in size, and; two dozen small ornaments about 1 to 2 inches in size.
Place the smaller ornaments toward the top of your tree and work toward the bottom hanging ornaments, varying your sizes as you work down. Make sure you get to the inside of the tree in order to provide depth.
Floral and ornament sprays
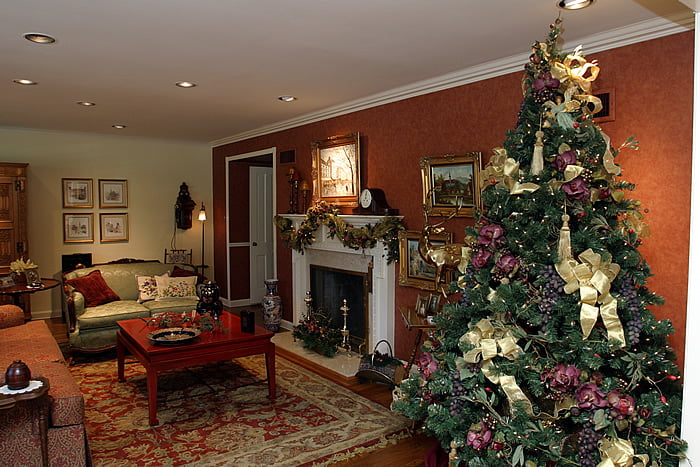
 You can hang ornaments from the branches but you can also place clusters, or “sprays” on top of the branches. This is where your creativity can be expressed with a glue gun! Try your hand at creating floral sprays, experiment by incorporating different botanical materials such as grapes, leaves, ornaments, or pine cones. Make sure you have a good supply of glue sticks and chenille pipe cleaners available for attaching and fastening.
Try your hand at creating floral sprays, experiment by incorporating different botanical materials such as grapes, leaves, ornaments, or pine cones.
Traditonal or Contemporary?
 Color schemes can be traditional or contemporary – or a bit of both! A traditional tree has multicolored ornaments and lights and incorporates the traditional Christmas colors of red and green in its design. If are layering your lights, using a white color as one of your layers is a perfect to highlight your traditional tree, as white does not detract from the colorful family ornaments that have been collected over the years.
Coordinate with your existing decor

Incorporate elements of your existing home decor into your tree to create a theme look. Start with the room’s existing accent colors or patterns from areas such as upholstery or window coverings. An area rug is often a great source of detail to draw from.
Don’t be afraid to think differently.
A contemporary tree will coordinate with the design of your home or area. In the past, I have used color combinations that include black, copper and even Asian influences as a way of providing a more contemporary look. However, achieving a more distinctive look takes a bit more planning and disciplines to achieve the finished presentation.
Remember, it may take a few years to fully develop your Christmas tree’s look. Think of this as development in layers of textures and details.
Final Tip: if you don’t quite get your act together in time for this year’s tree, it is never too early to start planning for next year’s tree. Shop the after Christmas sales for the bargains on ribbon and ornaments. If you do your shopping right, you won’t have to buy any new decorations for years to come.
